It is difficult to achieve silky and professional video transitions, even more so when you desire your clips to glide smoothly into one another. Transitions are required so that they can retain your audience or lose them.
With the help of AI avatars in the CapCut Desktop Video Editor, you can make your video look more polished and professional. Avatars add narration and presence, making transitions blend naturally with the flow of your story.
CapCut PC has tools that are step-by-step, making them easy for starters to use. Keep in mind that most of the features are free, but there are professional tools and effects that must be paid for.
Why Use AI Avatars to Add Transitions in Videos
Adding transitions within clips may be difficult, especially for starters who do not know how to ensure their videos flow smoothly.
The avatars also show you how your clips will change over, avoiding mistakes and enabling you to complete your edits faster. CapCut PC offers over 1,000 avatars and 150 AI voiceovers to guide you step by step.
Apart from aids like the AI image generator, voiceovers walk you through step by step what to do and show you the transition effects in real-time on screen. Using these avatars saves a lot of time because you don’t have to guess where each transition should be placed or how to make it appear.
Without prior editing skills, you can produce professional-looking videos that seem to be smooth and cohesive. This process gives your projects a professional look and is done in less time. It also makes it easy to keep all your videos uniform and visually captivating to your viewers.
Steps to Add Animated Transitions Using AI Avatars
Step 1: Install CapCut Desktop Video Editor
To begin with, download CapCut PC from their official website. The installation process is free, although some features and effects may be charged. Once the download is complete, navigate through the on-screen instructions to install the app and create an account if you do not already have one.
On successful login, open the editor to begin your video project. Having CapCut Desktop Video Editor on your PC will allow you to utilize all editing software and AI functions at any moment you need them.

Step 2: Import Your Clips
Click the Import button in CapCut PC to import all the video clips you wish to use. Make sure the clips are arranged properly on the timeline so your video flows naturally.
You may rearrange them if necessary by dragging each clip into its position. After arranging your clips, you can add transitions between them to control the pace of your video. When paired with an AI avatar, these transitions feel more engaging, as the avatar ties your scenes together with a consistent tone and presentation.
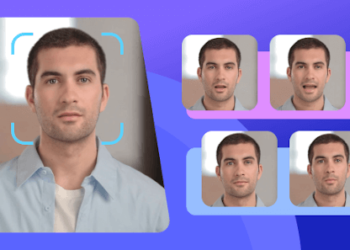
Step 3: Select Your AI Avatar
Go to the AI Avatar tab on CapCut PC. Browse through more than one thousand characters and pick the one that fits your video style. Place the avatar in your workspace to act as a visual guide.
As you edit, the avatar helps set the right tone, making transitions flow smoothly and keeping your clips connected. This step ensures that the mood of your vlog or video feels professional and consistent, avoiding errors and making the editing process more efficient overall.
Step 4: Add Voice and Generate
Choose one of the one hundred fifty AI voices to bring your script to life. Enter the text, select the animation style, and click Generate. Your avatar will now be ready to use within your video timeline.
As the avatar speaks, allowing transitions to be applied with better timing. This creates a seamless, polished flow from one section to the next.
By syncing voice and movement, your video feels engaging, professional, and visually well-structured for your viewers.
Step 5: Export and Share Your Video
After adding all the transitions, go to CapCut PC and click on the Export button. Select the resolution, frame rate, and file format that best suit your platform. You can export the video to your device or share it directly online.
Keep in mind that some of the high-def exports and advanced features will be paid for. Exporting lets you save your project as something watchable, so your viewers are able to view a silky, smooth video with all the transitions still in there.
Conclusion
Placing animated transitions on your videos makes them smooth and engages your audience. Using AI avatars in CapCut Desktop Video Editor helps guide the application of transitions and reduces the effort associated with editing. Even beginners can create professional-standard and smooth videos.
Note that while CapCut PC is free to download and use, payment may be required for certain advanced functionalities and high-end exports.
Start using CapCut Desktop Video Editor today, follow the guidance of the AI avatars, and add animated transitions to your clips and make your video professional-looking and engaging throughout.